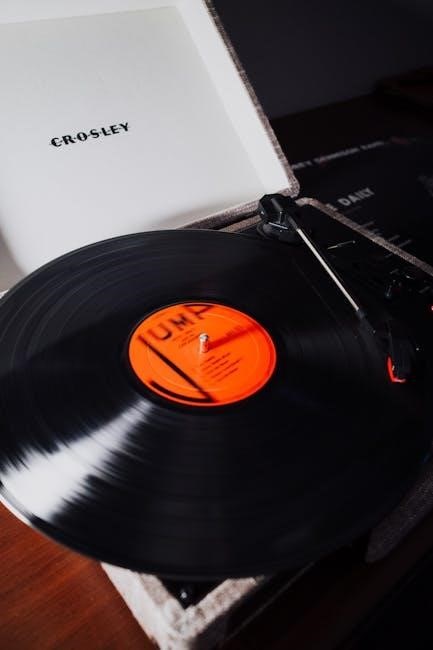
Safety Precautions
Always follow safety precautions when using your Crosley record player. Avoid exposure to water, handle the stylus gently, and ensure the turntable is placed on a flat, stable surface.
1.1. General Safety Guidelines
Read the entire manual carefully before operating your Crosley record player. Ensure the unit is placed on a flat, stable surface to prevent accidental tipping. Avoid exposing the player to water or excessive humidity, as this can damage internal components. Never handle electrical parts with wet hands. Keep the record player away from direct sunlight and heat sources. Always unplug the device before cleaning or performing maintenance. Avoid touching the stylus or record surface to prevent damage. Follow all safety instructions to ensure proper functionality and longevity of your Crosley record player. Store the manual for future reference and adhere to all precautions to guarantee safe operation.
1.2. Avoiding Water Exposure
Keep your Crosley record player away from water to prevent damage. Never operate it near water sources or in humid environments, as moisture can harm electrical components. Avoid cleaning the unit with wet cloths or liquids, as this may seep into internal parts. If the player gets wet, unplug it immediately and allow it to dry completely before use. Water damage can lead to malfunctions or electrical hazards. For cleaning, use a dry, soft cloth or a slightly damp microfiber cloth on external surfaces only. Avoid exposing the stylus or records to moisture, as this can cause warping or degradation. Always ensure the unit is dry before operation to maintain performance and safety.
1;3. Handling the Stylus and Records
Handle the stylus and records with care to maintain sound quality and longevity. Avoid bumping the stylus on the turntable mat or record edges, as this can cause damage or misalignment. Clean the stylus regularly with a soft brush, brushing from back to front only. For records, use a record cleaning brush and solution to remove dust and grease. Avoid touching the playing surface of the record, as oils from your skin can leave residue. Always store records upright in their sleeves to prevent warping. When placing a record on the turntable, ensure it is centered and secure. Gently lower the tonearm using the cue lever to avoid scratching the record surface. Handle both the stylus and records with precision to preserve their condition and ensure optimal playback performance.

Unboxing and Initial Setup
Carefully unbox your Crosley record player and verify all components are included. Place the unit on a flat, stable surface and ensure proper spacing for ventilation. Plug in the power cord and perform initial checks to ensure all features are functioning correctly before first use.
2.1. What’s Included in the Package
Your Crosley record player package typically includes the main unit, power cord, stylus, RCA output cables, 45 RPM adapter, dust cover, and an instruction manual. Some models may also include a USB cable for encoding records to digital formats or a Bluetooth adapter for wireless connectivity. Ensure all accessories are accounted for before setup. If any items are missing, contact Crosley customer service immediately. Verify the contents against the manual or manufacturer’s website to confirm your specific model’s inclusions. Properly unpack and organize all components to avoid damage during initial setup.
2.2. Placing the Record Player
Place your Crosley record player on a flat, stable, and level surface to ensure proper operation. Avoid areas near water or moisture, as this can damage the unit. Keep it away from direct sunlight and extreme temperatures. Position the player in a location with good ventilation to prevent overheating. Ensure the surface is clean and free from dust or debris to maintain sound quality. Avoid placing it near children or pets to prevent accidental damage. For optimal performance, place the record player on a sturdy table or shelf, away from vibrating devices or speakers to minimize resonance and skipping. Always follow the manual’s guidelines for placement to ensure longevity and functionality.
2.3. Checking for Missing Accessories
After unboxing your Crosley record player, carefully inspect the contents to ensure all accessories are included. Typically, the package includes the turntable, stylus, power cord, adapter (if applicable), and a user manual. Check for any damage or missing items, such as the dust cover, belt, or auxiliary cable. If you find anything missing or damaged, contact Crosley customer service immediately for assistance. Keep the original packaging for potential returns or exchanges. Ensure all components are accounted for before proceeding with setup to avoid delays or inconvenience. This step is crucial for ensuring proper functionality and a smooth user experience.
Understanding the Components
Understand your Crosley record player’s components. The turntable spins records, the tonearm holds the stylus, and the motor controls playback speed. The volume control adjusts sound levels, and the Bluetooth button enables wireless connectivity for seamless music playback.
3.1. External Parts of the Record Player
The external parts of your Crosley record player include the turntable, which spins the records, and the tonearm, which holds the stylus for playback. The motor powers the turntable, and the volume control adjusts sound levels. Additionally, the Bluetooth button enables wireless connectivity for streaming music. The turntable lid protects the platter, while the cabinet houses internal components. External controls may include speed selectors and a cue lever for precise needle placement. Familiarizing yourself with these parts ensures proper operation and enhances your overall listening experience. Always handle these components gently to maintain the record player’s performance and longevity.
3.2. Internal Components and Their Functions
The internal components of your Crosley record player include the motor, which drives the turntable’s rotation, and the belt, which connects the motor to the platter. The platter is the circular surface that holds the record and ensures smooth spinning. Inside, you’ll also find the tonearm mechanism, which moves the stylus across the record. Some models feature a built-in phono preamp, allowing direct connection to speakers without an external amplifier. These components work together to deliver high-quality sound reproduction. Proper care and maintenance of these internal parts are essential for optimal performance and longevity of your record player.
3.3. Identifying the Tonearm and Stylus
The tonearm is a long, thin metal arm that extends over the turntable and holds the stylus at its end. The stylus, often tipped with a diamond, reads the grooves on the record. Locate the tonearm on the side of the turntable; it is designed to move smoothly across the record. Use the cue lever to gently lift and lower the tonearm onto the record. Always handle the stylus with care to avoid damage. Regularly clean the stylus with a soft brush to ensure optimal sound quality and prevent dust buildup. Proper maintenance of these parts is crucial for clear audio playback and longevity of your record player.

Operating the Record Player
Place the record on the turntable, use the cue lever to lower the tonearm, and select the correct speed. Adjust the volume and enjoy playback via Bluetooth.
4.1. Placing the Record on the Turntable
To properly place a record on the turntable, ensure the surface is clean and flat. Gently remove the record from its sleeve by the edges, avoiding contact with the grooves. Place the record on the turntable mat, aligning the center hole with the spindle. Handle the record by the sides or edges to prevent fingerprints or scratches. Once secured, check that the turntable is stationary and the mat is free from dust or debris to ensure stable playback. Proper placement ensures optimal sound quality and reduces the risk of damage to both the record and the stylus.
4.2. Selecting the Correct Speed
Selecting the correct speed is crucial for proper playback. Most records play at either 33⅓ RPM or 45 RPM. Check the record label or sleeve for the recommended speed. Use the speed control knob or button, typically located near the turntable or on the control panel, to set the correct RPM. For 7-inch singles, use 45 RPM, while 12-inch albums usually require 33⅓ RPM. Ensure the speed matches the record to avoid distorted sound or damage to the stylus. Proper speed selection enhances sound quality and ensures longevity of both the record and the player. Always double-check the speed before starting playback.
4.3. Using the Cue Lever for Playback
The cue lever is used to gently lower and raise the stylus onto the record. To use it, ensure the record is spinning at the correct speed. Locate the cue lever, usually on the tonearm. Gently lift the lever to raise the stylus or lower it to place the needle on the record. This prevents scratching the vinyl or damaging the stylus. Always use the cue lever; never manually drop the needle. For automatic models, the lever may automatically lift and lower, but manual models require careful operation. Proper use ensures precise playback and protects your equipment. Always handle the cue lever with care to maintain optimal sound quality and longevity of your Crosley record player.
4.4. Adjusting the Volume Control
Adjusting the volume control on your Crosley record player ensures optimal sound quality. Locate the volume knob, typically on the front or top panel. Turn it clockwise to increase the volume and counterclockwise to decrease it. Set the volume to a comfortable level before starting playback to avoid sudden loudness. If connected to external speakers, adjust both the record player and speaker volumes for balanced sound. Avoid maximum volume to prevent distortion. For Bluetooth-connected devices, ensure the volume on both the record player and the connected device is adjusted for clear audio. Proper volume adjustment enhances your listening experience and protects your equipment from potential damage.
4.5; Connecting via Bluetooth
To connect your Crosley record player via Bluetooth, ensure both the record player and your device have Bluetooth functionality enabled. Turn on the Bluetooth feature on your device and search for available devices. Select the Crosley record player from the list, which may appear as “Crosley CR8005D” or a similar model name. Once paired, a light or sound indicator on the record player will confirm the connection. For stable playback, keep devices within range; If pairing fails, reset both devices and retry. Use the volume controls on both devices to adjust sound levels. Bluetooth connectivity allows wireless streaming from your device to the record player, enhancing convenience and flexibility.

Maintenance and Cleaning
Regularly clean the stylus with a soft brush and use a record cleaning solution for dust and grease. Wipe the turntable and cabinet with a microfiber cloth, avoiding harsh chemicals.
5.1. Cleaning the Stylus
Regularly cleaning the stylus is essential for optimal sound quality. Use a soft-bristled brush to gently sweep away dust and debris in a back-to-front motion only. Avoid using liquids or harsh chemicals, as they may damage the stylus. For more thorough cleaning, use a specialized stylus cleaning solution and a microfiber cloth. Never touch the stylus tip with your fingers, as oils from your skin can attract dust. Clean the stylus before and after each use to prevent dirt buildup and ensure clear playback. Proper maintenance extends the life of your stylus and improves your listening experience.
5.2. Cleaning the Records
Properly cleaning your records is crucial for maintaining sound quality and preventing damage. Start by gently removing loose dust with a record cleaning brush. For deeper cleaning, apply a small amount of record cleaning solution to the surface. Use a circular motion with a microfiber cloth to wipe the record, working from the outer edge toward the center. Avoid using household cleaners or harsh chemicals, as they can damage the vinyl. Always handle records by the edges to prevent oil from your fingers leaving residue. After cleaning, use a dry microfiber cloth to remove any remaining moisture. Regular cleaning ensures optimal playback and prolongs the life of your records.
5.3. Cleaning the Turntable and Cabinet
Regularly clean the turntable and cabinet to maintain your Crosley record player’s performance and appearance. Use a slightly dampened microfiber cloth to wipe the turntable lid and cabinet, ensuring no moisture seeps into the internal components. Avoid using harsh chemicals or abrasive cleaners, as they may damage the finish or harm electrical parts. For the turntable platter, use a dry microfiber cloth to remove dust and debris. Gently clean the tonearm with a soft brush to prevent dust buildup. Never immerse any part of the turntable or cabinet in water. Regular cleaning prevents dust accumulation and ensures smooth operation and optimal sound quality.

Troubleshooting Common Issues
Address common issues like skipping sound by cleaning the stylus or adjusting tracking force. If the turntable won’t spin, check power connections or belt condition. For Bluetooth issues, restart pairing or ensure devices are within range; Refer to the manual for detailed solutions to ensure optimal performance and resolve problems quickly.
6.1. Skipping or Distorted Sound
Skipping or distorted sound can occur due to a dirty or misaligned stylus, dust on records, or improper tracking force. Clean the stylus gently with a soft brush and ensure records are free from dust and grease using a record cleaning solution. Check the tonearm alignment and adjust the tracking force if necessary. Ensure the turntable is placed on a stable, level surface to avoid vibrations. Inspect records for warps or scratches, as these can cause playback issues. If distortion persists, try using a record weight to stabilize the record during playback. Refer to the manual for specific adjustment guidelines to resolve these common issues effectively.
6.2. Turntable Not Spinning
If the turntable fails to spin, first ensure the power cord is securely connected to both the record player and the power outlet. Check if the motor is switched on and the speed selector is set correctly. A worn or loose drive belt may also cause this issue; inspect and replace it if necessary. Ensure no obstructions are preventing the platter from moving. If the problem persists, consult the manual for troubleshooting specific to your model. Contact Crosley customer support for further assistance or potential repairs. Always refer to the user manual for guidance on resolving motor-related issues effectively.
6.3. Bluetooth Connectivity Problems
If you encounter issues with Bluetooth connectivity, ensure your device and the record player have Bluetooth enabled. Restart both devices and pair them again. Check that the record player is in pairing mode and your device is searching for available connections. Ensure no physical obstructions are affecting the signal and that devices are within range. If pairing fails, reset the record player by turning it off, waiting a few seconds, and turning it back on. Consult the manual for specific pairing instructions. If problems persist, contact Crosley customer support for assistance or to check for firmware updates. Proper pairing ensures seamless wireless playback.

Technical Specifications
The Crosley record player supports 7-inch and 12-inch records at speeds of 33 and 45 RPM. It features built-in speakers, USB, and AUX inputs for enhanced connectivity.
7.1. Supported Record Sizes and Speeds
Your Crosley record player is designed to accommodate standard vinyl formats, supporting both 7-inch and 12-inch records. It operates at two speeds: 33 and 45 RPM, catering to the majority of vinyl collections; For 45 RPM records, an adapter is often included to ensure proper playback. Certain Crosley models also support 78 RPM for older or specialty records, though this may vary by product. Always check your specific model’s specifications to confirm compatibility. This versatility allows you to enjoy a wide range of vinyl formats, from classic albums to singles and beyond, ensuring optimal performance for your listening pleasure.
7.2. Built-in Speakers and Sound Quality
The Crosley record player features built-in speakers designed to deliver clear and balanced sound. These speakers are optimized for vinyl playback, offering a warm and authentic listening experience. The sound quality is enhanced by the player’s internal equalization, ensuring a rich audio output. Volume control allows for easy adjustment to suit your listening environment. While the built-in speakers provide convenient playback, the sound quality may vary depending on the specific Crosley model. For a more immersive experience, you can connect external speakers via the RCA output. The Crosley record player strikes a balance between portability and audio fidelity, making it ideal for casual vinyl enthusiasts.
7.3. Additional Features (USB, AUX, etc.)
Your Crosley record player comes equipped with a variety of additional features to enhance your listening experience. The USB port allows you to encode your vinyl records into digital formats, making it easy to preserve your collection. The AUX input enables connection to external devices, such as smartphones or tablets, for expanded playback options. Many models also feature Bluetooth connectivity, letting you stream music wirelessly from compatible devices. Additionally, the 3.5mm auxiliary output provides flexibility for connecting to external speakers or amplifiers. These features make the Crosley record player a versatile and modern tool for enjoying both analog and digital music seamlessly. Explore these options to maximize your entertainment experience.

Additional Features and Accessories
Your Crosley record player may include a built-in dust cover for protection, a carrying handle for portability, and compatible accessories like replacement styli or record cleaning kits for maintenance.
8.1. Built-in Speakers for Convenience
Your Crosley record player features built-in speakers designed for ease of use and convenience. These speakers provide high-quality sound reproduction, allowing you to enjoy your vinyl collection without the need for external audio equipment. The built-in speakers are carefully tuned to enhance the listening experience, delivering clear and balanced audio. This feature makes the record player portable and self-contained, perfect for casual listening sessions. For optimal sound performance, ensure the speakers are clean and free from dust. Refer to the manual for guidance on adjusting volume or troubleshooting sound quality issues. The built-in speakers add to the overall versatility and convenience of your Crosley record player.
8.2. Using the USB Port for Encoding
The USB port on your Crosley record player allows you to encode your vinyl records into digital formats, such as MP3. Connect the USB drive to the port and follow the on-screen instructions to begin the encoding process. This feature is ideal for preserving your vinyl collection digitally. Ensure the USB drive is compatible and has sufficient storage space. The encoded files can then be transferred to your computer or other devices for easy playback. This convenient feature bridges the gap between analog and digital music, making it easy to enjoy your records in modern formats while maintaining sound quality.
8.3. Compatible Accessories
Your Crosley record player supports a variety of compatible accessories to enhance your listening experience. These include replacement styli, record cleaning kits, and optional speaker sets. The USB port also works with external devices for encoding. Ensure all accessories are Crosley-approved to maintain performance and warranty validity. Additional items like carry cases or adapters may be available for specific models. Always check compatibility with your record player model before purchasing. These accessories can be found on Crosley’s official website or authorized retailers. Using genuine Crosley accessories ensures optimal functionality and prolongs the life of your record player. Explore the range to customize your setup according to your needs.
Warranty and Customer Support
Your Crosley record player is backed by a limited warranty. For inquiries or issues, contact Crosley customer service. Retain your receipt and manual for warranty claims.
9.1. Warranty Information
Your Crosley record player is covered by a limited warranty, which protects against manufacturing defects for a specified period. The warranty typically lasts for one year from the date of purchase. To ensure coverage, retain your original receipt and manual. Damage caused by misuse, improper cleaning, or normal wear and tear is not covered. For warranty claims, contact Crosley customer service with proof of purchase. They will guide you through the process of repair, replacement, or refund, depending on the issue. Check the warranty card or manual for full details and terms.
9.2. Contacting Crosley Customer Service
For any inquiries, issues, or concerns regarding your Crosley record player, contact their customer service team. You can reach them via phone or email, as listed on the Crosley official website. Ensure you have your product model number and purchase receipt ready for efficient assistance. Their support team is available to address questions about warranty claims, troubleshooting, or missing accessories. Additionally, Crosley’s website offers a contact form for convenience. Response times may vary, so allow 24-48 hours for a reply. For urgent matters, calling directly is recommended. Always reference your product’s serial number and purchase details for smoother communication.
9.3. Returning or Exchanging the Product
If you need to return or exchange your Crosley record player, ensure the product is in its original packaging with all accessories included. Contact Crosley customer service to obtain a Return Merchandise Authorization (RMA) number, which is required for processing. Returns or exchanges must be made within the warranty period, typically 30 days from purchase. Clearly mark the RMA number on the outside of the return package and ship it to the address provided by customer service. Allow 7-10 business days for processing. Exchanges will be processed for identical or comparable products, while returns will be refunded to the original payment method, minus any shipping costs.
Enjoy your Crosley record player by following care tips and proper usage. Store it in a dry, cool place and handle records gently. Happy listening!
10.1. Best Practices for Longevity
To ensure your Crosley record player lasts for years, adopt these best practices. Regularly clean the stylus with a soft brush and avoid exposing it to water. Store records upright in sleeves to prevent warping. Keep the turntable on a stable, flat surface away from direct sunlight and moisture. Use a microfiber cloth to wipe down the cabinet and avoid harsh chemicals. Handle the tonearm gently and never touch the stylus tip. Store the unit in its original packaging during extended periods of inactivity. By following these care tips, you’ll maintain optimal performance and extend the lifespan of your Crosley record player.
10.2. Enjoying Your Crosley Record Player
Once your Crosley record player is properly set up, you can fully enjoy the nostalgic experience of listening to vinyl. Start by carefully placing your favorite records on the turntable and selecting the correct speed. Use the cue lever to gently lower the stylus for smooth playback. Adjust the volume control to your preference and connect external devices via Bluetooth or AUX for enhanced sound. The built-in speakers provide convenience, while the USB port allows for encoding your vinyl collection. Take your time to appreciate the warm, rich sound of analog music. With proper care and use, your Crosley record player will bring endless joy and a touch of classic charm to your music experience.
10.3. Storing the Record Player and Accessories
Properly storing your Crosley record player and accessories ensures longevity and prevents damage. Clean the turntable, stylus, and records before storage using a soft cloth, record cleaning brush, and solution. Store the record player in its original packaging or a sturdy box with padding like bubble wrap to avoid movement. Keep it in a dry, cool place away from direct sunlight and moisture. Store records upright in a separate crate or shelf, cleaned and in sleeves. Accessories like the stylus and cables should be stored separately in labeled pouches. Ensure the storage area is secure, away from pests, and check periodically to maintain condition. Consult the manual for specific storage tips, especially for the belt and tonearm. Handle records by the edges and use inner and outer sleeves for protection. Keep manuals with the player for easy reference.